Thursday, June 27, 2013

With Sympathy

 Playing around with techniques....


On the top card I embossed the thistles,and vines( Lavinia stamps) with Tim Holtz Seafoam white embossing powder, and then used Distress Inks-Faded Jeans,Wild Honey and Peeled Paint. I stamped the Faded Jeans and Peeled Paint on to  my ink resistant sheet and misted them with water. I then swiped the card through the colour until the desired effect was achieved. I then applied the Wild Honey in the same way to the top of the card and without dabbing too much of the colour off, dried it as it was. I quite like the dribbles that appeared.
Another couple of layers of Blue Jeans was added to the bottom until it was quite a bit darker in colour. The whole card was dried and then I dripped water onto the card and dabbed this off with a paper towel to get the droplet look. As the little butterfly did not turn out too well, I decided to cut two out of a Cherry Lyn  dye ( exotic Butterfly small) and attach over the embossed version. A piece of simple blue ribbon was tied around the base of the card and the sentiment was cut out using the Jasmine Cricut cartridge.
I

The second card, I used Faded Jeans and Squeezed Lemonade to colour the card. This time I embossed the wild flowers and vines ( Lavinia Stamps) using Stamp Effect Pearl Violet Thick enamel. I then added the colour with a Tim Holtz ink blending tool to get a softer look. I added the butterflies using the same day as above and a Stampin Up Sentiment. Pearls were added to the flowers and the sentiment.


Tick Tock

Tick Tock, ...
I purchased a couple of sets of Docraft dyes some time ago and have not had the opportunity to use them, so as the weekend weather was awful again, what better opportunity to sit and play.
These Docraft dyes are so affordable and you get lots in them. The cog pack comes with 9 different cogs which is very generous and they cut out beautifully with all the details showing. Equally the  watch pack comes with 5  options each with a different watch face, 4 sets of hands and two choices of the top fob piece. I have used two of the face options and two different hands options today.

Here are a couple of versions I made that would be suitable for birthdays for the males in the family.My brother has a 50th birthday coming up and I may use one for him.


The base card was embossed and lightly inked with distress inks, Walnut stain and Wild Honey. I cut the cogs[Docrafts /Papermania]out of coordinating card, and smudged walnut stain around the edges of the light coloured cogs and Black Soot onto the edges of the cogs cut our of brown card. The fob watches[Docrafts/Papermania] were cut out using one of the dies and I glued the pieces onto a another piece of round card as it seemed easier to keep everything together. The little hands were attached with a brad and a metal cog from Tim Holtz was attached with another brad. A bit of bling was places in the centre of the rest of the cogs and the Sentiment is a Tim Holtz one.

Thursday, June 20, 2013

Farewell


Originally I thought I had finished this card. It was minus the ribbon and two printed butterflies and pearls, but some how it looked unfinished I think that I placed the doily too far to the right and it seemed to over balance the pergola arch, so I added the ribbon, pearls and butterflies to balance it up  and felt a lot happier about it.

Firstly I cut from white card  the arch, which was a Spellbinders window dye ( Window Two) that I adapted for this profect and added a bit more of a base to it by using a Circut cartridge to cut the bottom boarder   and a doily from Couture creations. 
The doily was spayed with  Tim Holtz colourwash "Butterscotch" and "Sailboat Blue"
I threaded a piece of ribbon through the doily cut outs and twirled it across the card to add a bit of flow to the card. 
I used  little pearls and  attached them to the doily and the archway. 
I cut out some small leaves using the Cricut and threaded them up the archway and then placed some small flowers over the leaves. 
The butterfy was cut out using a Spellbinders die ( Les Papillions) and was sprinkled with glue and glitter The stamped butterflies were fussy cut and coloured using Mungyo crayons.
The top right corner was scrunched and a postage type stamp was stamped on the card underneath the printed paper.
The sentiment is from a Stampin Up set "Trendy Trees"

Bridesmaids

The inspiration for these pages came from the paper stack by My Minds Eye-In Bloom a glittered stack of papers.
The colours were so soft and beautiful and had soft apricot and burgundy colours on them so seemed a perfect match for the bridesmaid dressed.
I cut a frame out using the Cricut cartridge "elegant edges" (I think) and stamped a wee floral stamp on the corners just to soften the frame.
Flowers from my stash were arranged along the bottom edge and the name was cut using a Cricut font. I found a pack of sweet sparkly butterflies in a local craft store and used them on each of the bridesmaids dresses 


Love is all around us

Love is all around us we just have to look for it......On this day I felt the love all around me from friends and family and it was fabulous!


This was another wee page I put together using a proof sized photo.

The patterned paper is a 8x8 page from the Prima Pixie Glen stack. This is such a beautiful collection of pages. This soft blue was perfect for the layout, with it's gentle sketched flowers around the edge and corners.

Again Simplicity was was I wanted with not too many distractions from the photo and the Pixie Glen seemed to be so appropriate anyway.

I stamped an area with a brick stamp  and then placed the photo over this. 

The pretty flowers and butterflies were cut from a card that I had been given years ago and had kept knowing that one day I would have a use for it. 

Another little buttlerfly was placed under the photo on the left side and the word "love" was cut using a cricut cartridge ( Sorry can't remember which one LOL)

Tuesday, June 18, 2013

Love Grows Here

Cutting the Cake, wow what a wonderful day and feeling. You can see how happy were both were ( and so young too)

This time the background paper is from the DCWV "Ciao Bella Stack. An absolutely gorgeous selection of papers. I don't know about you but I love to have these papers in my stack and never want to use them because they are so lovely. I am getting braver and digging in, much to the delight of my fellow scrapbooking group of friends.

A piece of cardboard was ripped and used as the basis for the placement of the picture.

 A doily from a Creative Coutour dye called "Crystal Star" was used and a bit of colour was smudged onto the edges just to remove the starkness of the white card. 
The things I Love piece of card is cut from a My Minds Eye( Life Stories) card stack pad . 

The little swirl is a Bosscut dye and the Sentiment was from my stash. 

A few complimentary flowers and leaves were attached to this card on the right side.

Lovebirds


A piece of cream mulberry paper was used as the main background colour and this was mounted on a complimenting coloured page. Again I wanted to keep things simple . 

The photo was mounted on a piece of matching card from my stash and then the little trim was placed on the bottom of the picture. 

A heart from a pack of pre cut adornments and the bird (from the same pack) were selected . 

I  stamped the swirls on the top left and bottom right corner which would appear to be under the adornments. Little white flowers were placed by at he heart and the bird. The word lovebirds was cut out using the Cricut "Songbirds" cartridge.

The Bride

After 32 years in a not so pretty album, I have just started to scrap my wedding photos.
The background is a page from the DCWV Mariposa Stack. Such a beautiful collection of papers. 
I wanted to keep eveything soft and this fitted beautifully.
I kept the rest of the adornments simple by using a couple of butterflies cut from a Spellbinders dies collection"Les Papillions" and the bird cage was cut using another Spellbinders die "Bird Sanctuary"
Flowers and leaves from my stash were aranged around the bird cage and a wee piece of ribbon was threaded through the bird cage and pearls placed on the bottom and top to add a  bit of bling.

Thursday, June 13, 2013

Ye Old Cigar Box


I picked up this old cigar box at the local flea market .
The box was painted and then I glued old music sheets to the top and pieces to the sides. The edges were distressed and a bit of paint smudged onto the edges. 

Brown card was embossed and then inked with distress ink. Pieces of the embossed card were cut for the top and sides and glued down on top of the music paper. Another piece of card with a music print was placed on the top of the embossed card once the ink had dried.

A chipboard set of wings was painted cream and then paper from "My Minds Eye" 6x6 pad called Bramble Rose set the tone for the rest of the colour scheme. The flowers were cut out of the same paper pad using a Tim Holtz dye and scrunched and screwed up until they looked three dimension. A pearl brad was pushed through the centre to hold them together and they were glued into place.Little acrylic pink flowers were placed around these larger paper flowers. A smaller heart from my chipboard stash was placed on top (this already had a bit of a pattern in glitter on it) and a wee copper heart with a ribbon threaded through it was placed on the top.

Using an old fishing swivel  I attached a fish and copper disk to it and glued this onto the box under the flowers. Another piece from my chipboard stash- the frame- was painted and a small piece of complimenting paper was used to cover it . The edges were distressed. I stamped the word IMAGINE using a little alphabet set I have . Brads were placed on each  side of the frame. A vellum print out with the butterfly and script background was tucked into the frame under the text.9 as an experiment and I liked it so left it there)
I used some beads I had purchased to make a necklace, as feet, which were perfect.


Monday, June 10, 2013

Live the life

Live the life


I love this technique that I used in the blue card a few posts ago. Here is another go using the same techniques of inks and water and again inspired by a feature in the October Craft Stamper Magazine  by Kate Crane. Firstly this time I used Tim Holtz ditress inks Barn Door, Fire Brick.  The bottom and top edges were stamped with an lacy floral stamp by Tim Holtz  in archive black ink. I stamped the main image "Sweet Pea" stamp onto the card and another copy of the image onto another piece of card and fussy cut the main piece out. I coloured the image using Mungyo Water colour crayons and by painting the colour onto the desired areas.  I used a template and sqwished modelling paste through the wire mesh template and them smudged a bit of Tim Holtz Picket fence colour on the top to make bits of it stand out.The main image was placed over the stamped image using puff dots to raise it up. The little flowers were coloured by dabbing Distress Inks "Wild Honey" and "Scattered Straw" onto a craft sheet and spraying this with water , then dipping the flowers into the colour a few times depending on the intensity you want.  

Fly away Butterfly


 Butterflies and Moths


I have a long time love affair with these stamps. They always look so wonderful no matter how many you use at a time.
The background card is from a My Minds Eye stack called "Life Stories" which is a fabulous stack of cardboard coloured paper with travel, memo note type inscriptions along with printed backgrounds.

I used Tim Holtz Papillion stamp set for the background, and stamped one complete set on the bottom edge and them a one image to the top and bottom of the top edge.I masked the butterflies and over the top and  in between I stamped a little script stamp from Hero arts "Old French Writing".

Next a bit of stick on mesh was adhered to the back ground and a pieve of scrap blue card was cut using some old pinking shears. 

A circle was cut cut out of the top piece of card and the edges distressed and coloured with Distress Ink A   butterfly and scrip as stamped on a separate piece of card and placed underneath the frame.

A paperclip with a piece of preprinted ribbon from the Papermania "All aboard" kit was ties and clipped onto the edge. Beige hemp string ( Tim Holtz) was tied around the card and a butterfly was coloured using alcohol inks "Raisin and Expresso" by Tim Holtz.

Wonderful and Kind

Wonderful and Kind


I am having a grungy time as  you can see. I am still making cards and love the use of cardboard. I am going to explore a different way to use it now ( I have probably done enough of a similar theme. LOL)
Background card was used from a DCWV pack called "The Chateau Lavender " stack. This was also used to cut out one of the hearts. The background for the hearts was paper from my stash as was the red heart. (A great way to use up scraps is on cards). I stitched the background card and the top card separately so that I could place the doily and string around the top pieces of card.
A doily was cut out using one of the Couture Creations doily dies . This was placed behind the card (with the script) and the cardboard painted with gesso placed on top. The hearts were positioned on top of the cardboard and little flowers and leaves secured in place mid way down the card. A piece of string was tied around the card and sentiments stamped and attached at the bottom,Large pearls were placed in each corner


Dream

Dream a little dream

I wanted to do another card using some Lavinia stamps I have.

These combined with some free stamps I wanted to practice the brayering method as Tracy Dutton (Lavinia Stamps) does so well. Though I have not mastered the art of brayering ( it seems beyond me) I am better at smudging I think.
I started off brayering the colour onto the card and gave up as I just could not get a smooth enough look.
A mask was used for the moon and ripped paper was used to form the land. The trees and vines at the top of the page are Lavinia stamps. The little grass is from a Stampin Up  set  "Pocket Silhouettes".
The little rabbits and house were free with the Craft Stamper Magazine.The word "Dream" was stamped using an alphabet stamp set I have which came in a wee wood box (very cute).

Saturday, June 8, 2013

Inspiration


Inspire  yourself.. aren't we all looking for inpiration at some time. I have just brought a new Coutour creations Endless Dreams-Pergola dye and was dying to use it. Some inspiration came from Pinterest and this is what I ended up with.

The card was embossed with Tim Holtz "stitches" embosser on the edges.The background pater was stamped with Tim Holtz Papillion text in Archival Brillance ink- Moonlight white.

The dye was cut out and a wee swallow from a Cricut cartridge was placed on the top of the pergola. A few gems were attached to give it a more dimensional look..then the fun started.
From my stash I sourced these flowers and spent some time looking for the right shape and size leaves to place under the flowers. I ended up using a Dye from Heartfelt Creations by Spellbinders called Belle Rose. I used the thorny leave dye cut in this collection which was perfect
Little gems were placed into the purple flowers.
The sentiment from Pink Paislee stamp set Spring Jubilee was stamped onto card and placed at the bottom of the card.
I hope you enjoy my end result


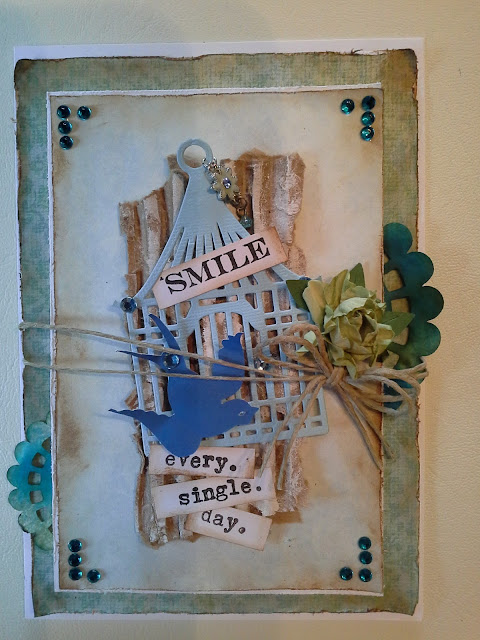
Smile...every single day


Smile... I am in the mood to make cards and have been doing so ...so that I have some in my stash for when the occasion arises.
Here is another one of those and I am loving the grungy look given by the card board but it is not too much which does not detract from the sophistication of the card either ( an I get to smudge and play too LOL)


A piece of complimenting background paper was cut distressed and placed on the main card. Two more pieces of card where then cut and used as the base for the decoration.

A piece of cardboard was ripped and smudged with white gesso. The gesso cardboard was placed in the centre of the card and the birdcage was cut out using  a Couture Creations dye called "Endless dreams -Birdcage" was placed on top.The swallow was cut using a Cricut cartridge from my supply and placed off centre to the base of the birdcage. 

The sentiment from  a Pink Paislee stamp set called Spring Jubilee and Glitz "Vintage Blue" was stamped onto card, which was inked to match the grunge look . Gems were placed on the sides of the card, birdcage and swallow to add a touch of pretty .

 A flower from my stash was placed by the birdcage. Before attaching everything to the card  string was wrapped around the card and tied in a bow on the side. 
A doily cut from a Cricut cartridge was sprayed with Adirondack Colour wash "Meadow" and "Sailboat Blue" These were placed under the top layers of the card.

Happy 75th Birthday

For Aunty Moira
My Mum's best friend turned 75 a week ago and as I could not attend the function I wanted to make her an extra special card.
A piece of background pre-patterned paper was selected from my stash and then stamped with a script Tim Holtz "Papillion" in gold.
The pretty white doily type edging was cut using  the Cricut Elegant Edges cartridge.
Flowers from my stash were placed up the side of the card and leaves cut using another Cricut cartridge ( can't remember ..LOL!)
The sentiment was printed on vellum and placed on a precut grunge card shape from my stash also. the top card was placed onto another piece of gold card and then layered onto the edging cut out. These were then all mounted onto a matching piece of turquoise  card.

For Charlotte

For Charlotte.... A new baby in our midst. My best friend is now a grandma and this is the card I made for the lucky new parents.
 Firstly I selected a background print that I wanted to be mainly pink. This pretty background paper is from Kaiser craft "Sweet Nothings" pad and was perfect with the flowers and butterflies on it. That was the inspiration for the rest of the card.
I ripped a piece of cardboard to the size I wanted and used this as the base  adding a bit of gesso to take away the "brownness' of the card and let this dry. I cut out a doily using a Coutour Creations doily "Autumn Reflections". This was then lightly sponged with one of the new Tim Holts Distress Inks colours called "Pinked Raspberry".
 A Birdcage was cut out using Spellbinders "Bird Sanctury" shapeability die and I glued lace to the top of the frame and also placed lace along the bottom of the cage  underneath the cut out so that there is a hit of lace showing there also.
I played around with the placement of the flowers from my stash. A piece of the beady string thingee was interlaced around the cage and through the flowers . I thought this added a bit more femininity to the card.
Little butterflies using  a Cherry Lyn design dye "Exotic Butterfly" small were used and I cut out two of the three butterflies, and  placed little gems in the middle to add a bit of prettiness to them. Pearls were added to the cage.

The words were cut using the Cricut "Graphically Speaking" cartridge. I sprayed the words with Tattered Angels "Glimmer mist-Silver" to add a bit of sparkle and dimension to the words.
"Welcome" (Stampin up) was stamped onto a piece of card, the edges distressed with a dusting of ink and attached using puff dots.